How To Make Rainbow Cake

1. Pick your cake
I love baking from scratch; it brings me a lot of joy and it simply tastes better to me. But if you're not as into baking, you can always use boxed cake mix.
Start by choosing your favorite white or yellow cake recipe/mix. Laurel's friend party was going to be small so I figured I only needed one 9-inch two-layer cake. I decided to try a classic white cake with buttercream frosting from Baking Illustrated because I was concerned that a yellow cake wouldn't take the colors as well. However, while the cake was good, I thought it lacked the moistness of a yellow cake (egg yolks will do that!) so I decided to go with a different recipe for the family party (and in the future, I'll definitely go with a yellow cake for the 9-inch two-layer). For the family party I needed a much bigger cake and opted for my favorite cake recipe: a lemon/sour cream cake with cream cheese frosting; however, instead of doing a sheet cake, I decided to go vertical. This sheet cake recipe accommodates two 9-inch pans + two 6-inch pans perfectly, thus creating a two-tier (i.e., four layer) cake. Very, very festive!
2. Mix the colors
Whatever cake you decide on (white or yellow will take the colors fine!), once the batter is made, divide it equally into six bowls. Then mix in the rainbow colors -- red, orange, yellow, green, blue, purple. Gel food coloring works great and you can find it in the grocery store or at cake specialty stores.
3. Drop the batter
This was the step that mystified our party guests. The colors definitely will stay separated so long as you just drop them in; don't try to spread and mix them or else you'll probably create mud! For example, with the two layer 9-inch cake, for each color bowl, split the batter between the two pans. Simply drop small spoonfuls of colored batter all around each pan. We decided to start with red as the bottom color in one pan and start in reverse with purple in the other so Laurel and I could drop batter at the same time without crowding over the same bowl. As you proceed with each color, fill in the gaps between other batter colors and sometimes overlap over colors.
With the white 9-inch cake, I periodically rotated each pan between my palms quickly to spread the batter. However, the sour cream cake batter was thicker and resistant to settling via shake out. It wasn't an issue though since once the batter hits the heat of the oven it will spread. But in general, if you are using a heavier batter like the sour cream batter, just try to drop your batter spoonfuls all the way to the edge of the pan so the batter has less way to travel (i.e., will settle better) than if it's all piled in the center.
4. Baking
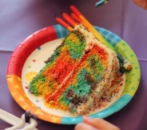
And that's it! Once the batter is dropped, simply follow your recipe's instructions for baking and cooling. Look how pretty this came out!
5. Frosting and decorating
As with the cake, pick your favorite frosting. I kept the decoration really simple. For the 9-inch layer cake, the recipe yielded just enough frosting to flat frost the cake so I simply covered the top in rainbow sugar crystals and planted the unicorn cake topper on top (note: for some bizarre reason, the unicorn came with a number code printed right across the belly; Laurel painted over it with white paint).
For the two layer cake, I had made a third extra frosting because I knew I would need extra to frost between layers (versus simply frosting a one-layer sheet cake). It turned out I had enough to pipe all around the sides and edges, which I prefer because it looks fancy yet to me is easier than trying to flat frost perfectly. I did flat frost the top of the cake and the showing top of the bottom layer and Laurel covered those top areas with the same rainbow sugar crystal sprinkles. And we used the unicorn topper again on the two-tier cake. And we used rainbow candles of course.
When we cut into each of these cakes, the kids and grownups freaked out. Admittedly, I freaked out a little too. It looked so cool!
Final Thoughts
First, I am a huge proponent of engaging kids in the kitchen. Laurel is six years old and has been baking with me for a long time so she helped with every step -- mixing the batter, mixing in the food coloring, dropping the batter into the pans, and decorating. And she had a great time doing it! If you have younger kids, depending on their (and your) comfort level in the kitchen, you could simply have them help dump ingredients, or stir in food coloring, etc.
Second, before we started the project I had no idea it would come out so cool; the effect was like tie dye and the colors were so vibrant! You could easily repeat this same process for cupcakes; I would just recommend maybe one color spoonful per cup (instead of multiple tiny ones). You could also use this same method if your kid has favorite colors (e.g., pink and purple, green and blue) or for holidays. The possibilities are endless.


